
Part Two of a Copywriters’ Kitchen two-part series: Worm Composting in 7 Simple Steps
If you read yesterday’s Copywriters’ Kitchen post, you realize the positive impact your household can have on the environment—simply by composting your garbage.
You discovered you don’t need a garden—or even outdoor space—to compost. New Yorkers now compost in tiny apartments with a bin, a bagful of worms—and a little help from the Lower East Side Ecology Center (LESEC).
In yesterday’s post we unearthed some myths and facts about composting.
Today you’ll find out how to set up your own Worm Condo.
Build your Worm Condo in 20 minutes with these 7 easy steps
Many thanks to Tara DePort, LESEC’s Program Director and Carey Pulverman, LESEC’s Manhattan Project Director, who taught us the following composting steps:
- Buy or make a Condo: You need an eight to ten-gallon plastic bin with tight-fitting lid, see photo, below. This provides the one-square foot of surface space needed to support a pound of worms. A household of one to three people can manage with one bin. If you have four to six family members, you’ll need at least two bins.
- Prepare bedding: Tear newspaper or other paper into strips, see photos, below. Tip: Use paper printed with soy ink, if possible—The New York Times and many other papers now use soy ink.
- Moisten bedding: Take a handful of shredded paper, dip in water and squeeze to remove excess moisture, see photo, below. Fluff damp paper—think aeration.
- Fill bin with bedding—dampened and fluffed—until it’s 2/3 full, see photo, below. Note: Over the weeks and months, you’ll need to add more damp bedding as your worms turn paper into compost.
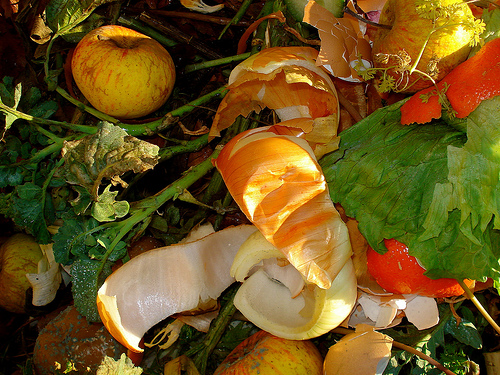
- Add food, vegetable scraps, coffee grounds, eggshells, leftovers. Tuck food beneath bedding. For best composting action, mentally divide your bin into a 6-square grid. Place scraps in one square per week, move on to the next square and work your way through the grid over a 6-week period. Then start back at square-one. Note: Citrus and tropical fruits can have parasites that upset the worms. To avoid problems, freeze these fruits before adding to bin. For more guidance on what to compost, see NYCCompost.org’s Master Composter Manual.
- Welcome worms. Gently sprinkle worms on top of bedding, see photo, below. Leave top off bin for one hour: Worms dislike light and this encourages them to burrow down to food. Note: Your worms are living things. Try to settle them comfortably into their Condo as soon as possible, ideally within a few hours and no more than 24 hours after you buy them. Park the Worm Condo in a dark, temperate place—55-75 degrees, NOT OUTSIDE. For more on worms, see Composting Dos and Don’ts and More Composting Resources, below.
- Harvest compost after 2-3 months when bedding starts to look like dark, crumbly soil. To harvest, move all bedding/compost to one side of bin. Stop feeding worms for two weeks. After two-week diet, add food to other side of bin. Wait two more weeks—your worms will move over to the side with the chow. Gather the rich, worm-free compost on the first side. Mix it with potting soil, add it to your garden or give it to lucky gardener friends.


Easy 4-ingredient recipe for rich, dark compost
Worm composting depends on a few simple elements. Your worms thrive, says Carey, on the following four “ingredients”:
- Air: The container must allow drainage and air flow—when making a Condo, drill enough holes, see Indoor Composting with a Worm Bin (PDF).
- Water: The Worm Condo must be kept damp. Food and bedding should be moistened before you add them.
- Food: Vegetable peels, coffee grounds, eggshells, leftovers. No meat, dairy, greasy food. For more guidelines, see Master Composter Manual: What to Compost Tip Sheet (PDF).
- Bedding: Strips of newspaper or other paper. Yay! You can finally get rid of that huge pile of used printing paper.
Worm composting dos and don’ts
Do use Red Wiggler worms. Originally from Europe, Red Wigglers live in the earth’s leaf layer. They happily adapt to the Condo’s leaf-like damp paper strips.
Don’t try to compost indoors with garden-variety earthworms—you’ll just end up with a stinky worm graveyard.
Do follow the 4-ingredient recipe for indoor compost, see above.
Don’t turn your Condo into a worms’ Guantanamo and deprive them of basics—they’re living things!
Do make a grid (mentally) dividing your bin into six squares. Put food in one square per week; move on to a new square each week.
Don’t overload your Worm Condo.
Do tuck food underneath bedding.
Don’t dump food on top of bedding.
Do keep an eight-cup plastic lidded container in the freezer to collect and freeze citrus, tropical or fresh-cut-from-the-garden vegetation.
Don’t put these items directly in your Worm Condo or you may end up with fruit flies, parasites and other unwanted visitors.
Do keep worms in a dark, temperate place.
Don’t keep worms outside in cold or hot weather.
More composting resources
Explore the Lower East Side Ecology Center (LESEC) website
Visit LESEC at the Union Square Green Market Composting Stand
North Plaza, Union Square Park
17th Street and Park Avenue South
Year-round: Monday, Wednesday, Friday, and Saturday from 8am to 5pm
At LESEC’s Union Square stand you can:
- Buy Worm Condo kits for just $55
- Buy Red Wiggler worms for $22 a pound or $12 for half a pound—a HUGE bargain
- Drop off organic scraps if you can’t or don’t want to compost in your apartment


Great post. Very comprehensive ideed.
I hope lots of people follow your directions.
Hi Mr. Dirty Boots:
Coming from the Compost King, that’s a real compliment!
Thanks for coming by Copywriters’ Kitchen.